"Homemade Zeera Biscuits: Perfectly Crispy and Flavorful"
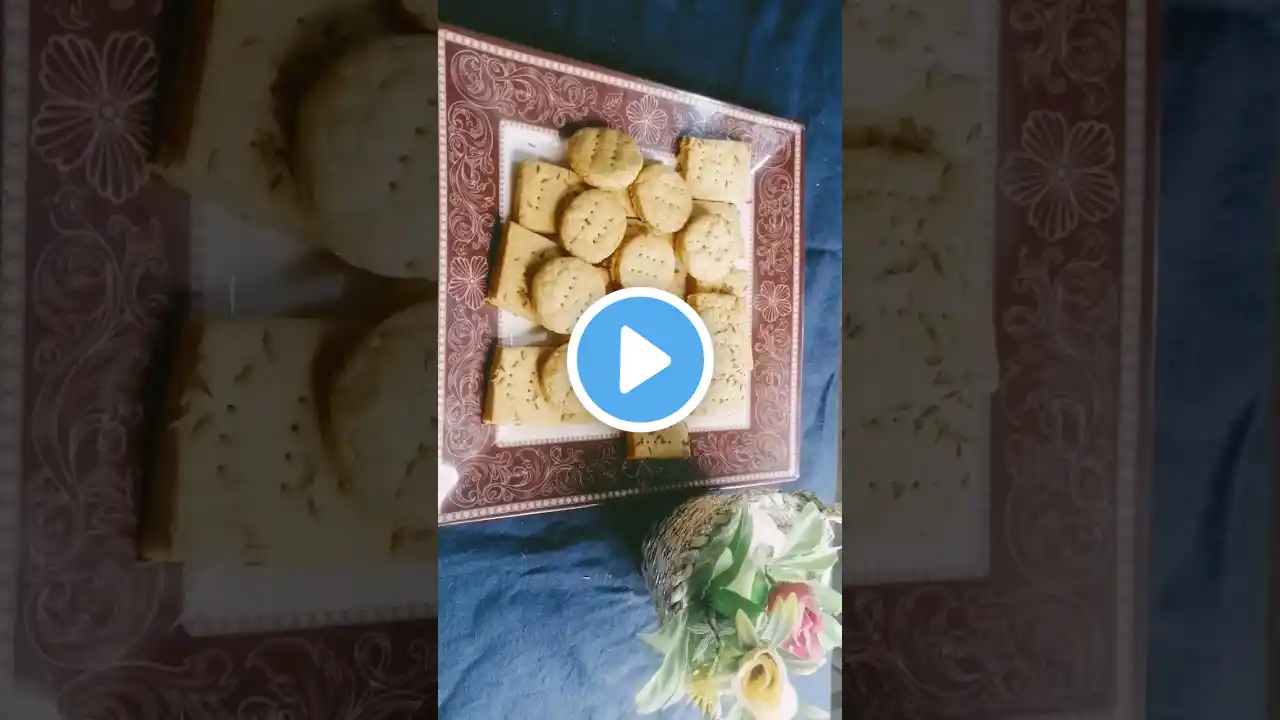
jeera biscuit recipe,jeera biscuits recipe,biscuit recipe,zeera biscuit recipe,biscuit recipe without oven,jeera biscuit,jeera biscuits,jeera biscuit recipe without oven,biscuits recipe,zeera biscuit,jeera biscuits recipe with wheat flour,without oven biscuit recipe,biscuit recipe easy,zeera biscuits easy recipe,zeera biscuits,zeera biscuits recipe,biscuit recipe in urdu,biscuits recipe without oven,atta jeera biscuit recipe Here are some popular keywords for a Zeera biscuit recipe: Zeera biscuits Cumin cookies Cumin biscuits recipe Jeera biscuits recipe Savory cookies Indian biscuits Eggless cumin biscuits Homemade Zeera biscuits Tea-time biscuits Bakery-style cumin cookies Let me know if you'd like the full recipe! Zeera Biscuit Recipe (In English, Urdu, and Hindi) --- Ingredients All-Purpose Flour (Maida): 2 cups Cumin Seeds (Zeera): 1 tbsp (lightly roasted) Butter: 1 cup (at room temperature) Powdered Sugar: ½ cup Salt: ½ tsp Baking Powder: ½ tsp Milk: 2-3 tbsp (if needed) --- Instructions 1. Roast the cumin seeds: Lightly roast the cumin seeds in a dry pan for 1-2 minutes until aromatic. Set aside to cool. 2. Cream butter and sugar: In a mixing bowl, beat the butter and powdered sugar together until light and fluffy. 3. Mix dry ingredients: Sift together all-purpose flour, baking powder, and salt. Add the roasted cumin seeds to the flour mixture. 4. Combine wet and dry ingredients: Gradually add the dry ingredients to the butter-sugar mixture. Mix until the dough comes together. If it’s too dry, add 1 tablespoon of milk at a time. 5. Chill the dough: Wrap the dough in plastic wrap and refrigerate for 20-30 minutes. 6. Shape the biscuits: Preheat your oven to 180°C (350°F). Roll out the dough to about ¼ inch thickness and cut into desired shapes using a cookie cutter. 7. Bake: Place the biscuits on a greased or parchment-lined baking tray. Bake for 12-15 minutes or until edges are golden. 8. Cool and serve: Let the biscuits cool completely before serving or storing in an airtight container. --- Urdu Translation اجزاء میدہ: 2 کپ زیرہ: 1 چمچ (ہلکا بھنا ہوا) مکھن: 1 کپ (کمرے کے درجہ حرارت پر) پسی ہوئی چینی: ½ کپ نمک: ½ چائے کا چمچ بیکنگ پاؤڈر: ½ چائے کا چمچ دودھ: 2-3 چمچ (ضرورت کے مطابق) ترکیب 1. زیرہ بھونیں: زیرے کو خشک فرائنگ پین میں 1-2 منٹ تک ہلکا بھون لیں۔ ٹھنڈا ہونے دیں۔ 2. مکھن اور چینی ملائیں: ایک پیالے میں مکھن اور چینی کو ہلکا اور نرم ہونے تک پھینٹیں۔ 3. خشک اجزاء شامل کریں: میدہ، بیکنگ پاؤڈر، اور نمک چھان لیں۔ اس میں بھنا ہوا زیرہ شامل کریں۔ 4. سب کچھ مکس کریں: آہستہ آہستہ خشک اجزاء کو مکھن اور چینی کے آمیزے میں شامل کریں۔ اگر ضرورت ہو تو دودھ ڈالیں۔ 5. ڈو کو ٹھنڈا کریں: آمیزے کو پلاسٹک میں لپیٹ کر 20-30 منٹ کے لیے فریج میں رکھیں۔ 6. بسکٹ بنائیں: اوون کو 180°C پر گرم کریں۔ ڈو کو بیل کر اپنی پسند کے سانچے سے کاٹیں۔ 7. بیک کریں: بسکٹوں کو بیکنگ ٹرے پر رکھیں اور 12-15 منٹ کے لیے بیک کریں۔ 8. پیش کریں: بسکٹوں کو مکمل ٹھنڈا ہونے دیں۔ ائیر ٹائٹ ڈبے میں محفوظ کریں۔ --- Hindi Translation सामग्री मैदा: 2 कप ज़ीरा: 1 चम्मच (हल्का भुना हुआ) मक्खन: 1 कप (कमरे के तापमान पर) पिसी हुई चीनी: ½ कप नमक: ½ चम्मच बेकिंग पाउडर: ½ चम्मच दूध: 2-3 चम्मच (ज़रूरत के हिसाब से) विधि 1. ज़ीरा भूनें: ज़ीरे को सूखी कढ़ाई में 1-2 मिनट तक हल्का भून लें। ठंडा होने दें। 2. मक्खन और चीनी मिलाएँ: मक्खन और चीनी को अच्छे से फेंटें जब तक यह हल्का और फूला हुआ न हो जाए। 3. सूखी सामग्री मिलाएँ: मैदा, बेकिंग पाउडर और नमक को छान लें। उसमें भुना हुआ ज़ीरा मिलाएँ। 4. सारी सामग्री मिलाएँ: धीरे-धीरे सूखी सामग्री को मक्खन-चीनी मिश्रण में डालें। अगर ज़रूरत हो, तो थोड़ा दूध डालें। 5. डो को ठंडा करें: डो को प्लास्टिक रैप में लपेटकर 20-30 मिनट के लिए फ्रिज में रखें। 6. बिस्किट बनाएँ: ओवन को 180°C पर पहले से गरम करें। डो को बेलकर मनचाहे आकार में काटें। 7. बेक करें: बिस्किट को बेकिंग ट्रे पर रखें और 12-15 मिनट के लिए बेक करें। 8. परोसें: ठंडा होने के बाद परोसें या एयरटाइट कंटेनर में रखें। Turns out the liver is actually very healthy. It has an array of benefits as it is the most nutrient-dense organ meat. Who would have thought?! If you have anaemia, ihope you enjoy watching this video please like you valuable feedback , if you any question , please leave a commonts below don't forget to subscribe to our channel for move videos , thank you so much , GOD BLESS YOU ALL LOTS OF DISCLAIMER;-------------------- all in the information in this cooking channel is for education purpose only , recipe's tips and tricks is for information on purpose only , choose the recipe that you want to make depending on the availability of ingredient and the time you have ,
